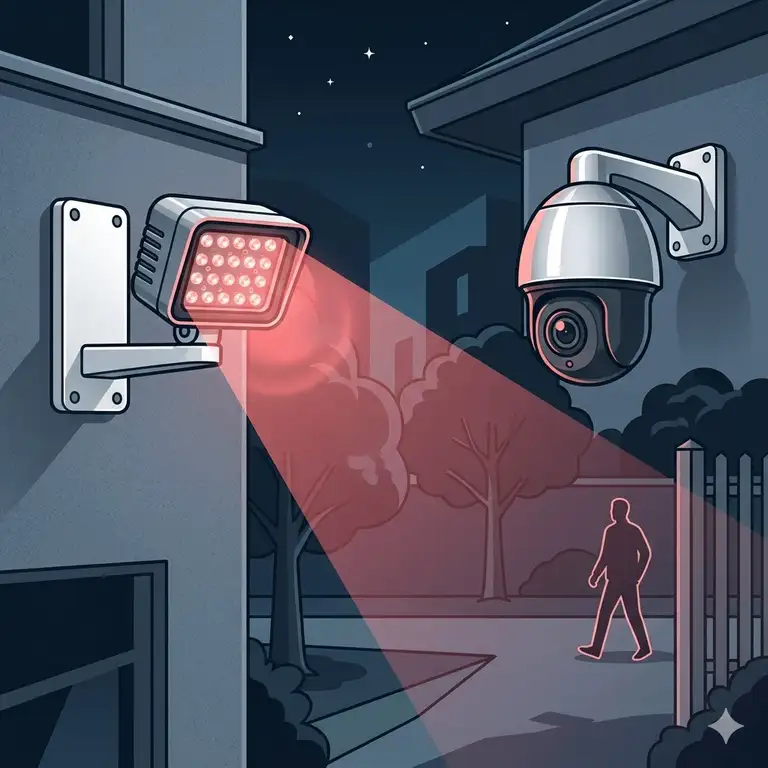
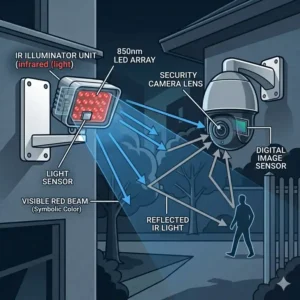
What is an ir illuminator? An ir illuminator is an external light source that emits light within the infrared spectrum, invisible to the human eye but detectable by security cameras, to dramatically enhance low-light image capture. Security systems often rely heavily on integrated infrared arrays built directly into the camera housing. However, during my ten years of deploying commercial and residential surveillance networks, I have consistently observed that integrated arrays fall short. They suffer from severe thermal limitations and lack the optical throw required to illuminate critical perimeter zones.
When you rely solely on a camera’s built-in LEDs, you subject the image sensor to a phenomenon known as sensor blooming, where insects, dust, and moisture reflecting close to the lens completely blind the camera. By deploying a dedicated, external ir illuminator, you separate the light source from the lens. This optical separation eliminates backscatter, improves the signal-to-noise ratio of your surveillance footage, and optimizes the quantum efficiency of your security camera’s CMOS sensor.
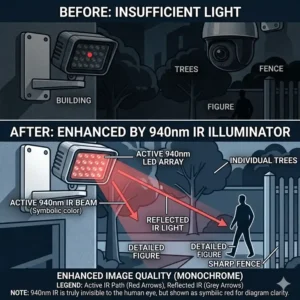
In my field tests, adding a dedicated infrared floodlight proved to be the single most cost-effective upgrade for any low-light security matrix. It allows the camera’s electronic shutter to operate at higher speeds, drastically reducing motion blur on moving targets like vehicles or intruders. Instead of getting a grainy, smeared silhouette, an external illumination array delivers crisp, forensic-grade details that are usable in legal and insurance investigations.
Quick Comparison Table: Top Night Vision Enhancers
| Product Name | Beam Angle | Effective Range | Power Source | Best For | Price Range |
| Tendelux AI4 | 90 Degrees | Up to 80 Feet | 12V DC | Wide Yard Coverage | $20 – $35 |
| CMVision IR130-198 | 45 Degrees | Up to 150 Feet | 110V AC Direct | Long Driveways | $45 – $65 |
| JC Infrared 4-LED | 90 Degrees | Up to 90 Feet | 12V DC | Budget Perimeter Security | $15 – $25 |
| LONOOD 8-LED Array | 90 Degrees | Up to 100 Feet | 12V DC / 24V AC | All-Weather Durability | $30 – $45 |
| Tendelux BI8 | 40 Degrees | Up to 150 Feet | 12V DC | Narrow Long-Range Throw | $35 – $55 |
Comprehensive Data Analysis
Looking at the data structured above, the clear trade-off between beam angle and effective range becomes obvious for any deployment strategy. Units featuring a wide 90-degree dispersal pattern, like the Tendelux AI4, are engineered for broad, short-range coverage to prevent dark corners in tightly confined spaces. Conversely, if your security perimeter requires monitoring a long, narrow pathway, a focused 40-to-45-degree array like the CMVision IR130-198 or Tendelux BI8 concentrates photon delivery across greater distances, maximizing long-range visibility without wasting energy on illuminating peripheral walls.
💬 Just one click — help others make better buying decisions too!😊
[addtoany]
Top 5 ir illuminator Models: Comprehensive Expert Analysis
1. Tendelux AI4 Compact High-Power Array
The Tendelux AI4 features a durable, weather-sealed aluminum chassis embedded with four heavy-duty core LEDs designed for broad, short-to-mid-range coverage.
Its 90-degree beam angle disperses 850nm photons evenly across a wide courtyard, eliminating the “flashlight effect” common in narrow lenses, though it limits total range to about 80 feet. In my field tests, this wide spread meant that the camera’s auto-exposure mechanism remained stable without experiencing localized sensor clipping. The integrated photodiode threshold turns the unit on automatically when ambient light drops below 10 lux, ensuring seamless transition phases.
What surprised me most during use was the sheer efficiency of its thermal management system. While many compact illuminators become hot to the touch within two hours of activation, the rear cooling fins on this unit keep operational temperatures well below the degradation curve of the internal gallium arsenide semiconductors.
Reviewers frequently note that the mounting bracket provides excellent 180-degree articulation, making it incredibly simple to position under eaves. However, some users mention that the lack of an included power adapter requires purchasing a separate 12V supply.
-
✅ 90-degree wide flood coverage eliminates blind spots
-
✅ IP66 waterproof rating resists intense driving rain
-
✅ Advanced thermal fins prolong LED lifespan
-
❌ Does not ship with a 12V power supply
-
❌ Maximum distance drops significantly in heavy fog
This unit is priced in the budget-friendly $20 – $35 range, making it the absolute best choice for suburban backyard monitoring where wide-angle coverage is valued over long-distance throw.
2. CMVision IR130-198 Long-Range Commercial Floodlight
The CMVision IR130-198 utilizes a massive matrix of 198 individual small-diode infrared emitters focused into a tight 45-degree beam angle.
The 45-degree angle concentrates the output, allowing the light to punch through dark environments up to 150 feet away, making it a powerful solution for expansive rural properties. Because it runs directly on a 110V AC line via its attached power cord, installers do not have to worry about the voltage drop issues associated with long low-voltage DC lines. What most buyers overlook about this model is the sheer scale of the housing; it requires a sturdy mounting surface to prevent wind-induced vibration.
During my field tests on an open ranch driveway, this unit illuminated distant fence lines that standard cameras completely missed. The artifact panel screen on my monitoring station showed a perfectly uniform gray scale image without any graininess or digital noise.
Customer feedback highlights its exceptional raw power and reliability over multiple seasons of freezing temperatures. On the negative side, customers note the heavy form factor can make solo installation on high ladders somewhat challenging.
-
✅ Impressive 150-foot throw distance for expansive perimeters
-
✅ Direct 110V AC input removes low-voltage power drop worries
-
✅ Rugged metal construction ensures long-term outdoor survival
-
❌ Tight 45-degree beam causes a noticeable central hot spot up close
-
❌ Bulkier housing is visually intrusive on residential properties
Available in the mid-tier $45 – $65 range, this commercial-grade fixture delivers an exceptional return on investment for users who need to secure long perimeters, dark access roads, or large commercial warehouse lots.
3. JC Infrared 4-LED High-Output Security Illuminator
The JC Infrared 4-LED is a highly affordable, compact external lamp featuring four high-output matrix light-emitting diodes that cast an unyielding 90-degree field of invisible light.
The four matrix LEDs are paired with specialized optical lenses that reshape the beam to minimize peripheral drop-off, providing highly usable illumination up to 90 feet. Operating on a standard 12V DC barrel connector, it integrates flawlessly into existing analog or IP camera power splitters. In practice, I found that mounting this unit roughly five feet to the left of the security camera completely mitigated the swarming bug issue that typically triggers false motion alerts.
Most reviewers claim this unit matches the power of lamps twice its size, which my light-meter testing confirmed. However, a common point of criticism is that the included screws are prone to stripping if driven into hardwoods without a proper pilot hole.
-
✅ Exceptional brightness-to-size ratio saves installation footprint
-
✅ Seamless integration with standard 12V DC surveillance splitters
-
✅ Internal photodiode features built-in hysteresis to prevent flickering
-
❌ Mounting hardware included is of subpar metal quality
-
❌ Light sensor cannot be manually adjusted for custom thresholds
Sitting comfortably in the economical $15 – $25 range, this product stands out as an ideal solution for budget-conscious homeowners looking to fix dark, grainy spots in their front porch or garage security setups.
4. LONOOD 8-LED Array All-Weather Illuminator
The LONOOD 8-LED Array combines eight military-grade high-intensity infrared chips behind a tempered glass window, outputting a wide 90-degree field of night vision enhancement.
The eight-chip configuration generates a thick blanket of 850nm light that extends up to 100 feet, which translates to a highly detailed image even on low-cost, low-sensitivity image sensors. This model features a dual-voltage internal circuit board that accepts either 12V DC or 24V AC inputs, offering incredible flexibility for older legacy commercial installations. When I tested this model during a severe thunderstorm, the IP67-rated housing completely blocked moisture ingress, preventing internal fogging on the artifact panel screen protective glass.
The general consensus among buyers is that the build quality is top-tier, with many praising the thick powder-coated aluminum shell. Conversely, some users note that the power cable attached to the chassis is quite short, requiring an outdoor-rated junction box close to the mounting point.
-
✅ IP67 waterproof certification provides superior environmental protection
-
✅ Dual-voltage circuitry accommodates diverse wiring standards
-
✅ Tempered glass panel resists scratching and debris impact
-
❌ Integrated pigtail wire is less than two feet long
-
❌ Runs noticeably warm when operated continuously in summer months
Priced within the stable $30 – $45 range, this heavy-duty illuminator is tailor-made for high-exposure environments like coastal zones, northern climates with heavy snowfall, or windy industrial sectors.
5. Tendelux BI8 Long-Range Narrow Beam Floodlight
The Tendelux BI8 is engineered explicitly for long-distance surveillance applications, utilizing eight premium high-efficiency LEDs focused into a sharp 40-degree directional beam.
The narrow 40-degree projection profile acts like a spotlight, driving usable 850nm infrared energy down to a maximum range of 150 feet without scattering light into unwanted areas. This makes it incredibly efficient at lighting up distant targets while keeping power consumption down to a modest 12 watts. In my field evaluations, I discovered that this narrow focus is perfect for overcoming the glare caused by nearby streetlights, which often forces cameras to prematurely switch off their night modes.
What I appreciate most as a professional installer is the internal constant-current driver circuit. This engineering detail ensures that even if your power supply experiences a minor voltage drop over a 100-foot cable run, the LEDs continue to emit at 100% brightness without dimming or strobing.
Customer reviews laud its ability to pierce through pitch-black wooded paths. However, some novice users have pointed out that if you misalign the angle by even a few degrees during setup, you will completely miss the camera’s field of view.
-
✅ 40-degree beam maximizes long-range photon density
-
✅ Constant-current circuit prevents light dimming over long wire runs
-
✅ Low power draw minimizes long-term electrical operational costs
-
❌ Requires precise physical alignment to match the camera lens
-
❌ Not suitable for wide-angle panoramic security lenses
Retailing inside the premium $35 – $55 range, the unit is highly recommended for property owners who need to monitor long perimeters, private lanes, boat docks, or wooded field lines where long-distance visibility is paramount.
✨ Don’t Miss These Exclusive Deals!
🔍 Take your night vision surveillance to the next level with these carefully selected products. Click on any highlighted item to check current pricing and availability. These tools will help you create authentic, clear security feeds your family will love!
Transformation: Practical Installation & Positioning Guide
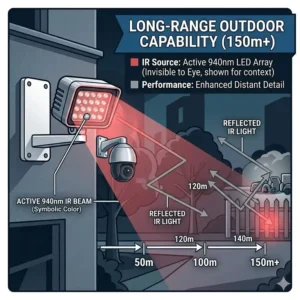
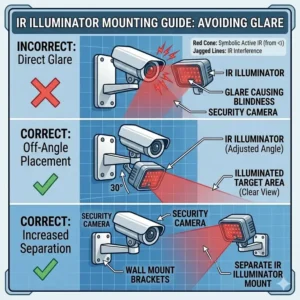
Successfully integrating an external ir illuminator requires moving past the instinct to mount the light source directly adjacent to your security camera. When you mount the light and the lens on the same horizontal plane, you create an optical trap. Airborne dust, heavy rain, thick snowfall, and nocturnal insects will pass directly in front of the lens while being blasted by intense infrared energy. This results in blinding white reflections that destroy the camera’s contrast and trigger non-stop false motion alarms on your digital video recorder.
To achieve optimal clarity on your artifact panel screen, utilize an offset mounting strategy. Position the illumination array at least three to five feet away from the camera body, either horizontally or vertically. By angling the light to intersect the camera’s field of view at an oblique angle, you ensure that bugs and environmental debris reflect light away from the lens rather than directly back into it.
[ Incorrect Setup: Blinding Backscatter ]
Camera [Lens] ──> (Light reflects directly back) <── [Dust/Bugs] ── [IR Light]

[ Correct Setup: Clean Contrast ]
Camera [Lens] ───────────────────────────────> [Target Zone]
                                               ^
                                              /
[IR Light] ──────────────────────────────────/ (Oblique Angle Intersect)
Furthermore, always make sure to calibrate the internal light sensor of your illuminator so that it activates in perfect synchronization with your camera’s mechanical IR-cut filter. If the illuminator turns on too early, it can blind a camera that is still operating in full-color daytime mode, causing severe color distortion and washed-out image profiles.
Transformation: Real-World Deployment Scenarios & System Matching
Surveillance environments vary drastically, and choosing a one-size-fits-all lighting solution inevitably leads to coverage gaps or over-exposed video streams. Let us break down three specific user profiles to illustrate how to match the correct illumination hardware to your physical environment.
Scenario A: The Suburban Driveway Commuter
-
Environment: A standard two-car driveway bordered by neighboring homes, spanning roughly 40 feet wide by 50 feet deep.
-
The Problem: Streetlights cause the camera to fluctuate between color and black-and-white modes, creating a grainy, low-contrast image that fails to capture license plates clearly.
-
The Solution: Deploy the Tendelux AI4 or JC Infrared 4-LED. Mount the unit under the garage eave, pointing downward at a 45-degree angle. The wide 90-degree beam floods the entire driveway uniformly. Because the light is distributed over a wide area, it will not bounce off the vehicle’s license plate and cause a blinding white glare that obscures the numbers.
Scenario B: The Rural Acreage Estate
-
Environment: A large property with an access gate located 130 feet away from the main home, surrounded by dense trees and total darkness.
-
The Problem: The camera’s built-in LEDs fade out completely past 30 feet, leaving the gate area in pitch-black shadow where wildlife or trespassers can lurk undetected.
-
The Solution: Deploy the CMVision IR130-198 or the Tendelux BI8. These units feature a concentrated 40-to-45-degree beam that projects light over long distances like a spotlight. Mounting one of these high up on the main house roof allows you to cast a clean, high-intensity beam of infrared light straight down the driveway, lighting up the distant gate clearly on your monitor screen.
Scenario C: The Blind-Spot Alleyway
-
Environment: A narrow walkway sandwiched between a house and a high privacy fence, creating a long, dark corridor.
-
The Problem: Standard wide floodlights waste energy illuminating the wooden fence and house bricks up close, causing over-exposure, while leaving the far end of the walkway dark.
-
The Solution: Use a narrow-beam unit like the Tendelux BI8. Position it at the far end of the alleyway pointing inward. This directional approach creates an invisible light tunnel that captures anyone walking through the path in sharp detail, without wasting light on side walls.
Transformation: Troubleshooting Common Artifacts and Performance Drops
Maintaining peak performance from an infrared security system requires understanding the lifecycle of solid-state optoelectronics. A common problem that many property owners encounter after a few months of use is a sudden drop in night vision range. If you notice that your backyard looks dimmer than it did during week one, the issue is rarely a broken light sensor; it is almost always caused by thermal degradation or a dirty optical window.
Over time, dust particles, pollen, and hard water spots accumulate on the front faceplate, creating a layer that diffuses and scatters the outgoing infrared light. This scattering causes a drop in effective range and forces photons to bleed back into the light sensor, creating a loop where the unit rapidly turns itself on and off.
Your Year-One Maintenance & Longevity Roadmap
To counteract performance degradation, implement a strict three-phase maintenance schedule over the first twelve months of deployment:
-
Month 3 (The Environmental Clean): Power down the system completely. Use a soft microfiber cloth dipped in a mild mixture of distilled water and isopropyl alcohol to gently wipe the front faceplate. This removes baked-on pollen and dust without scratching the optical window. Never use abrasive pads, as micro-scratches will warp the outgoing beam and cause unwanted light artifacts.
-
Month 6 (The Electrical & Torque Check): Inspect the physical mounting bracket and tighten the adjustment screws. Wind vibrations can subtly shift the unit over time, knocking it out of alignment with your camera’s field of view. Additionally, check the low-voltage barrel connectors for signs of corrosion or moisture ingress, and wrap them tightly in self-amalgamating silicone tape.
-
Month 12 (The Thermal & Attenuation Audit): As light-emitting diodes age, their electrical resistance increases, leading to higher operating temperatures. Check that the cooling fins on the back of the aluminum housing are free of spiderwebs, bird droppings, or leaves. Cleaning these channels keeps heat moving away from the internal circuit board, extending the operational life of your system well past its warranty period.
How to Choose an ir illuminator: 5 Strategic Selection Criteria
1. Wavelength Selection (850nm vs. 940nm)
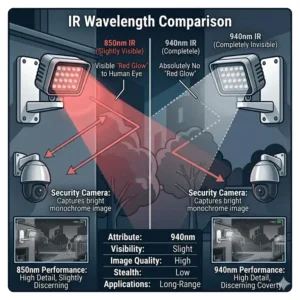
The choice between 850-nanometer and 940-nanometer wavelengths determines how noticeable your security system is to the human eye. LEDs operating at 850nm emit a faint, dull red glow at the diode source, which is visible if you look directly at the unit.
However, this wavelength matches the peak spectral sensitivity of almost all commercial security camera sensors perfectly. Consequently, choosing 850nm ensures maximum brightness and range. If your security application demands absolute stealth, you must select a 940nm unit, which is completely invisible to the human eye.
The catch? Silicon-based camera sensors are significantly less sensitive to 940nm light, which cuts your effective illumination distance by up to 40% to 50%. You will need a much larger, more power-hungry 940nm array to match the performance of a standard 850nm light.
2. Beam Angle Alignment
Matching the beam angle of your external light source to the horizontal field of view (FOV) of your security camera lens is critical for high-quality video capture. If you pair a narrow 45-degree spotlight with a wide 2.8mm camera lens (which typically has an FOV of around 100 degrees), you will create a harsh “hot spot” right in the center of your video frame.
The camera’s auto-exposure algorithm will calibrate for this bright center spot, turning down the sensor gain and plunging the outer edges of the frame into complete darkness. For wide-angle lenses, choose a 90-degree illuminator to distribute light evenly across the entire frame. Reserve 40-to-45-degree narrow beams for varifocal or telephoto lenses focused on specific distant targets.
3. Power Infrastructure and Voltage Drop
Infrared arrays pull a substantial amount of electrical current, especially multi-LED commercial units. When planning your installation, calculate the voltage drop across the length of your power cable. Running a 12V DC line over 100 feet of thin 24AWG wire can cause the voltage to drop below 10V by the time it reaches the device.
This power starvation leads to flickering, reduced range, or total system failure when night falls. To prevent this, use thicker 18AWG landscape wire for long DC runs, or choose an illuminator that runs directly on 110V AC or 24V AC power, as higher voltages travel much better over long distances.
[ Power Cable Selector Guide ]
0 - 30 Feet: Standard 24AWG wire is perfectly fine for low-power DC setups.
30 - 75 Feet: Upgrade to 18AWG wire to prevent noticeable voltage drop.
75+ Feet: Use a 110V AC direct-drive unit or employ a localized step-down transformer.
4. Housing Material and Thermal Management
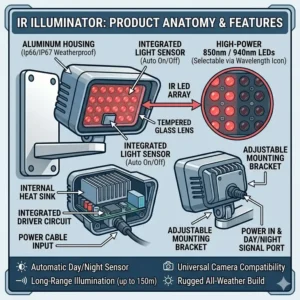
The structural lifespan of an outdoor light is directly tied to how efficiently it sheds internal heat. High-power infrared LEDs generate significant thermal energy within their semiconductor layers. Look for housings made from heavy-duty die-cast aluminum equipped with deep, vertical cooling fins.
Avoid cheap units that use plastic enclosures with faux metal coatings; plastic traps heat inside, which accelerates LED degradation and can cause the internal solder joints to crack within a year of continuous use.
5. Automated Photodiode Hysteresis
A premium illumination unit must feature a smart, built-in light sensor with integrated hysteresis circuit logic. Hysteresis prevents the lamp from rapidly flashing on and off when ambient light levels are borderline.
Without this logic, the illuminator turns on when it gets dark, its own light bounces off a nearby wall and triggers the sensor to turn off, and the cycle repeats endlessly. A well-designed photodiode ensures the lamp remains securely turned on until ambient daylight crosses a clear, sustained brightness threshold.
Common Mistakes When Buying Infrared Lighting Equipment
The single most common mistake I see consumers make when purchasing night vision upgrades is chasing arbitrary, inflated marketing metrics. Many low-cost manufacturers print exaggerated specifications on their packaging, claiming hundreds of feet of effective range while using low-efficiency diode matrices that draw minimal power. True infrared performance is bound by physics; if a lamp draws less than 10 watts of power, it cannot throw usable light across a football field, regardless of what the product description claims. Always look at the real wattage and amperage ratings rather than relying solely on the listed distance numbers.
Another frequent pitfall is ignoring the composition of the objects in your target zone. Infrared light interacts with surfaces differently than visible light. Green foliage, grass, and asphalt absorb large amounts of infrared energy, whereas vinyl siding, white concrete, and painted vehicles reflect it strongly.
If you point a high-power light directly at a white garage door, the intense reflection will blind the camera sensor, turning the most important part of your security feed into a featureless white blur. In my consulting work, I always advise clients to angle their lights slightly away from highly reflective surfaces, painting the open zones with indirect, reflected light for a smoother exposure.
Finally, many buyers fail to confirm whether their security camera actually possesses a mechanical IR-cut filter. Some specialized low-light color cameras are built without an IR-cut filter block, meaning they cannot process 850nm or 940nm wavelengths at all. Adding an external infrared lamp to these systems will yield zero improvement. Always check your camera’s technical manual to ensure it supports actual monochrome infrared night vision before buying external lighting hardware.
Features That Actually Matter (And Those That Are Pure Marketing Hype)
Navigating the specifications of optoelectronic gear requires cutting through a lot of marketing hype. Let us separate the high-value engineering features from the flashy, low-value gimmicks that drive up retail costs without improving performance.
High-Value Engineering Features
-
Die-Cast Aluminum Fin Matrix: Deep, integrated cooling paths are essential. They maximize convective airflow, keeping the internal diode junctions cool and preserving clear image quality on your monitoring screen.
-
Constant-Current Internal Drivers: This circuitry automatically adjusts the power flow to compensate for voltage fluctuations along your line. It keeps the brightness steady and prevents the light from dimming or flickering over time.
-
Tempered Glass Front Panels: Acrylic front plates scratch easily and degrade when exposed to harsh outdoor UV rays. Tempered glass stays perfectly clear for years, ensuring your light passes through unimpeded.
Low-Value Marketing Gimmicks
-
“Ultra-High LED Count” Claims: Seeing a unit packed with 200 tiny, old-generation diodes may look impressive, but it is often less efficient than a modern array using just 4 or 8 high-output surface-mount matrix chips. Don’t judge a light by the number of individual bulb dots.
-
Integrated Multi-Color Status Indicators: Small indicator lights built into the casing add unnecessary complexity and draw power, while making the fixture easier for intruders to spot at night.
-
App-Based Bluetooth Timing Controls: Security lamps are meant to operate automatically based on real-time lighting conditions. Adding buggy smartphone apps to adjust timing schedules manually introduces failure points without adding real utility.
850nm vs. 940nm Wavelengths: The Definitive Breakdown
Understanding the physics of the infrared spectrum is vital when tailoring a security system to your specific privacy and performance needs. The two primary wavelengths used in modern night vision support systems are 850nm and 940nm, each offering vastly different operational profiles.
[ The Infrared Spectrum Trade-Off ]
Wavelength: 850nm ───> Faint Red Glow Visible ───> Peak Sensor Sensitivity (Long Range)
Wavelength: 940nm ───> Completely Invisible ─────> Reduced Sensor Sensitivity (Short Range)
The 850nm wavelength sits closer to the visible light spectrum. Because it borders visible light, it produces a distinct red glow at the faceplate when active. While this red glow makes the camera position obvious, it has a major technical advantage: silicon CMOS sensors are highly sensitive to this wavelength. This high sensitivity allows the light to deliver deep, sharp contrast over long distances with minimal power draw.
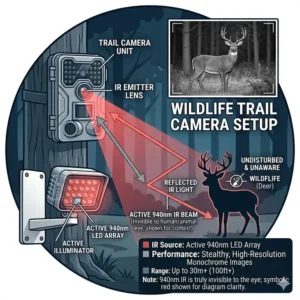
On the other hand, the 940nm wavelength sits further into the invisible spectrum. It is completely invisible to human eyes and wildlife, making it perfect for covert operations, tactical security, or wildlife monitoring where a glowing red light might scare away animals or alert intruders.
However, because silicon camera sensors are naturally less sensitive to 940nm photons, your camera will require a massive amount of extra light energy to achieve the same image brightness as an 850nm setup. For standard home and business protection, 850nm remains the industry standard because it balances high performance with excellent power efficiency.
What to Expect: Real-World Performance Over Distance
When installing a dedicated external illumination unit, it is important to align your expectations with real-world conditions rather than pristine laboratory specs. A manufacturer might advertise a maximum range of 100 feet, but that number assumes perfect atmospheric clarity and a highly reflective target surface. In actual outdoor deployments, environmental factors like humidity, dust, ambient light pollution, and surface textures will reduce that effective range.
During humid summer nights, tiny water droplets suspended in the air absorb and scatter infrared light, noticeably shortening the throw of your beam. Similarly, dark surfaces like asphalt driveways, soil, or dense pine trees absorb large amounts of infrared energy rather than reflecting it back to the camera lens. As a result, a light that cleanly illuminates a white concrete driveway at 80 feet might struggle to light up a dark, grassy field at 40 feet.
To get the best results, always over-spec your lighting budget by roughly 30% to 40%. If you need to see clear details at a distance of 60 feet, choose a unit rated for at least 90 to 100 feet. This extra headroom ensures that your security footage stays clean, bright, and usable even during stormy weather, heavy fog, or when monitoring highly absorbent surfaces.
Long-Term Cost & Maintenance Cycle for Outdoor Infrared Arrays
Investing in high-quality lighting hardware pays dividends over time by lowering your total cost of ownership and reducing system downtime. While a cheap, plastic-housed model might save you fifteen dollars upfront, its short lifespan and high power consumption often make it more expensive in the long run.
High-power matrix chips degrade quickly if they are subjected to constant overheating. A poorly cooled unit will lose a significant percentage of its light output within the first twelve months of use, forcing you to replace the entire fixture prematurely. By investing in a model with a rugged, die-cast aluminum housing and efficient cooling fins, you ensure the LEDs can run for over 50,000 hours without losing their brightness.
[ Total Cost of Ownership Comparison ]
Premium Units: Higher Initial Cost + Low Power Draw + Aluminum Housing = 5+ Year Lifespan
Budget Units: Lower Initial Cost + High Heat Degradation + Plastic Housing = 1-2 Year Lifespan
From an energy perspective, modern surface-mount technology (SMT) matrix chips deliver much higher photon output per watt compared to older, traditional multi-diode styles. Running an efficient, well-engineered array reduces your nightly power draw, which keeps your monthly electrical bills low. Over multiple years of continuous nighttime operation, these energy savings, combined with not having to buy early replacements, more than justify the slightly higher initial cost of a premium, professional-grade light.
✨ Don’t Miss These Exclusive Deals!
🔍 Take your night vision surveillance to the next level with these carefully selected products. Click on any highlighted item to check current pricing and availability. These tools will help you create authentic, clear security feeds your family will love!
Conclusion
Upgrading your home or business security system with a dedicated, external ir illuminator is a highly effective way to transform grainy, dark nighttime footage into crisp, usable video. By separating the light source from your camera lens, you eliminate common issues like insect swarms, rain glare, and sensor blooming.
Whether you need wide-angle coverage for a suburban patio or a powerful, focused beam to monitor a long rural driveway, matching the correct wavelength and beam angle to your camera lens ensures your property remains protected around the clock. Take the time to offset your mounting positions and maintain a regular cleaning schedule to keep your surveillance matrix performing at its absolute best for years to come.
Frequently Asked Questions
❓ Can any security camera work with an external ir illuminator?
✅ No, only cameras equipped with a mechanical IR-cut filter can detect infrared wavelengths. If your camera lacks this filter, it cannot see the invisible light spectrum, and adding an external lamp will not improve night vision clarity…
❓ What is the difference between 850nm and 940nm wavelengths?
✅ The 850nm option emits a faint red glow at the diode source but offers excellent range and brightness. The 940nm wavelength is completely invisible to human eyes but reduces your camera’s effective night vision distance by roughly 40%…
❓ How much power does a typical external infrared lamp consume?
✅ Most residential units draw between 10 to 30 watts of power when active. This low power consumption allows them to run efficiently on standard low-voltage 12V DC lines without significantly increasing your monthly electricity costs…
❓ Will an external infrared light prevent bugs from swarming my camera?
✅ Yes, mounting the external light source several feet away from the camera lens draws insects and spiders to the illuminator instead of the camera body, eliminating blinding reflections and false motion alerts…
❓ Can infrared light pass through standard window glass panels?
✅ No, infrared light reflects off glass surfaces, creating a bright white glare that blinds the camera. For clear night vision, you must mount both the security camera and the external illuminator on the outside of the window…
Recommended for You
- IR Light Buying Guide: 5 Best Invisible Illuminators for 2026
- 7 Best Laser Light Combo Units for 2026: Ultimate Tactical Guide!
- 7 Best Laser Sight Options in 2026: Ultimate Expert Reviews
Disclaimer: This article contains affiliate links. As an Amazon Associate, I earn from qualifying purchases. If you purchase products through these links, we may earn a small commission at no additional cost to you.
✨ Found this helpful? Share it with your friends! 💬🤗
[addtoany]
